Sunday 19 October 2014

Google Official Contact Form for Static Pages in Blogger

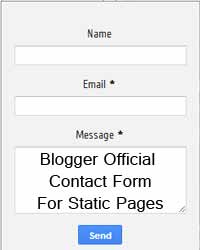
Blogger released it's brand new Contact Form Widget for Blogger Users .It helps to send e-mails to blog owner without Sign In to Google or any other account. Anyone can send mails by providing a valid e-mail address and Message. But there is a problem with that Widget. We posted an article about "How to add Blogger Official Contact Form?" It only works as a Widget (it occupies in Sidebar / Footer), it can place in Static Pages. In many popular websites/blogs they use a page for Contact Form. By default this Contact Form can only used as widget, we are introducing a technique to use Google Official contact Form on Blogger Static Pages.

Check our Contact Us Page for Demo
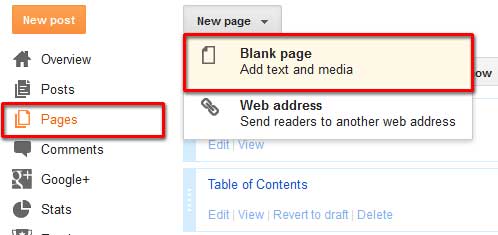
  • Sign In to Blogger Dashboard
  • Select Pages -> Create Blank Page

  • Switch to HTML mode from Compose Mode.
  • Click on HTML in left top of the Page
  • Copy the Following code inside it and Save
<table><tbody>
<tr><td>Name</td> <td>
<input class="contact-form-name" id="ContactForm1_contact-form-name" name="name" size="30" type="text" value="" />
</td></tr>
<tr> <td>
Email<span style="font-weight: bolder;">*Mandatory</span></td><td>
<input class="contact-form-email" id="ContactForm1_contact-form-email" name="email" size="30" type="text" value="" />
</td></tr>
<tr> <td>
Message<span style="font-weight: bolder;">*Mandatory</span></td><td>
<textarea class="contact-form-email-message" cols="25" id="ContactForm1_contact-form-email-message" name="email-message" rows="5"></textarea>
</td></tr>
<tr><td align="center" colspan="2">
<input class="contact-form-button contact-form-button-submit" id="ContactForm1_contact-form-submit" type="button" value="Send" />
</td></tr>
<tr><td align="center" colspan="2">
<div style="max-width: 222px; text-align: center; width: 100%;">
<div class="contact-form-error-message" id="ContactForm1_contact-form-error-message">
</div>
<div class="contact-form-success-message" id="ContactForm1_contact-form-success-message">
</div>
</div>
</td></tr>
</tbody></table>

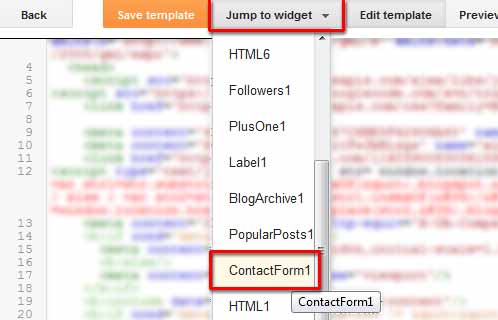
  • Go to Template -> Edit HTML
  • Click on Jump to Widget and take Contact Form1

  •  Click on the arrow before <b:widget id='ContactForm1' locked='false' title=' Contact Us' type='ContactForm'>
  expand-contact-form-widget-main-includable

  •  Delete the portion inside <b:includable id='main'> ........ </b:includable>


delete-bincludable-of-contact-form
  • Now Sidebar Widget will not appear.
  • Click on Save

Posted on Sunday, October 19, 2014 by Unknown

No comments

Friday 17 October 2014

A simple guide to terminate, delete or cancel Facebook account, together with the Facebook profile easily.
terminate

Posted on Friday, October 17, 2014 by Unknown

No comments

Seesmic DesktopFacebookerXobniFacebook Sidebar GadgetScrapboy and Facebook AIR application are desktop applications that allows you interact with your stream just as you would on Facebook, but without the browser.

Posted on Friday, October 17, 2014 by Unknown

No comments

FireStatus is a status update utility for multiple social networks, including FaceBook.
firestatus

Posted on Friday, October 17, 2014 by Unknown

No comments

Gabtastik and digsby let you keep Facebook chat sessions open on your Windows desktop outside of your regular web browser, using minimal screen real estate and system memory.

Posted on Friday, October 17, 2014 by Unknown

No comments

OutSync is a free Windows application that syncs photos of your Facebook friends with matching contacts in Microsoft Outlook. It allows you to select which contacts are updated. So you can update all contacts at once or just a few at a time.
outsync

Posted on Friday, October 17, 2014 by Unknown

No comments

This Greasemonkey script – Facebook: Cleaner removes many of the annoying ads and updates that unavoidably appear on your Facebook pages.
ads

Posted on Friday, October 17, 2014 by Unknown

No comments

A little-known feature in Facebook that lets you decide who shows up in that Friends box. Click that "edit" pencil in your Friends box and type the names of your best friends in the box that says "Always show these friends"
friend_photos

Posted on Friday, October 17, 2014 by Unknown

No comments

This service has been discontinued. X-Friends is a unique tool for tracking friends that disappear from Facebook.
X-friends

Posted on Friday, October 17, 2014 by Unknown

No comments

I’m sure that this has happened to you before. Someone you have ties to, whether it’s a co-worker, your boss, or even worse, a parent, has finally discovered social networking and wants to be your newest Facebook friend.
For me personally, that’s no big deal. I’m fairly open about my online activities. Everything I write, Digg, or otherwise share goes through my FriendFeed to myTwitter then ultimately onto my Facebook (my, that sounds naughty). Besides that, just about everyone I’d consider a co-worker is already on Facebook, and would have little issue about my other Internet activities.
Putting all that aside however, imagine for a moment that I worked at Domino’s Pizza and that I don’t want my boss to know that I just became a fan of Papa John’s (writing this one’s gonna make me hungry). Here’s what I would do to hide Facebook status updates and keep that fact confined to my closer friends:
On your Facebook home page, you should see the ‘Settings’ menu close to the search field on your upper-right. Open that menu and go to ‘Privacy Settings’.
privacysettings   How to Friend Someone on Facebook & Hide It From Your Status Updates
On the next page, you’ll have four choices: Profile, Search, News Feed, and Applications. What you’ll want to edit here are your Profile privacy settings.
privacysettingslist   How to Friend Someone on Facebook & Hide It From Your Status Updates
By default, everything on your profile is limited to your Friends and your Networks (your first Network is likely your city of residence, but you may have joined more). From the screenshot above, you can see that I’ve limited everything on my profile to my Friends and their Friends. Anyone else who visits my profile will only see that I have a profile, but will not see what’s on it.
In my example, you’re going to want to edit the setting on your Status Updates, since you don’t want your boss to know that you’ve “fanned” the competition. Click that dropdown menu and then select ‘Customize’.
statusupdateexception   How to Friend Someone on Facebook & Hide It From Your Status Updates
You may want to tweak your overall privacy setting here, but what we’re aiming for is the “Except These People” list at the bottom of this dialog. Type out the name of any of your Friends to restrict that person from viewing anything in your Status Updates.
For all you faithful Facebook fans, we’ve got a lot of tips and tricks on how to make the most of the site. If you have any privacy tips or concerns to share, please drop them in a comment. I’m off to order pizza.

Posted on Friday, October 17, 2014 by Unknown

No comments

Sendible lets you schedule Facebook messages ahead of time so you can send messages to your friends, customers or colleagues in the future.
sendible

Posted on Friday, October 17, 2014 by Unknown

No comments

hellotxt and Ping.fm both introduced features that let Facebook administrators update Facebook Pages.
hellotxt

Posted on Friday, October 17, 2014 by Unknown

No comments

Flickr2Facebook is an unofficial Flickr to Facebook uploader(bookmarklet) which allows you upload photos to Facebook from Flickr.
flickr2facebook

Posted on Friday, October 17, 2014 by Unknown

No comments

FacePAD: Facebook Photo Album Downloader allows you to download your friends’ facebook albums, Events albums, and Group Albums, en masse, with the click of a button.
facepad

Posted on Friday, October 17, 2014 by Unknown

No comments

stylish clock blogger

Here I am saying about How to Add a Stylish Flash Animated Clock to your Blogger Blog.Here is a huge collection of Clock widgets for your taste.Follow the Simple Steps below to make your Blog Stylish,Cool, and Smart looking Blog.


  • First of all SignIn to your Blogger Account 
  • Select Design->Page Elements
  • Click on Add Gadget
  • Select HTML/javascript from it,then copy the code of clock you want.
 

    Step 1: If you want a NON Static Clock Widget,then Just copy and paste the code to HTML/javascript content.

    If you want a cool static clock,then first do the step above and Click HERE

    Add Stylish Flash Clock 1


    • If you want to add this Clock,then Copy  and paste the below code
    <div class="noop-clock"><center><embed height="140" src="http://www.hitarek.com/clock/clock24-6.swf?TimeZone=IST&amp;Place=&amp;" type="application/x-shockwave-flash" width="210"></embed></center><center><a style="font-size: 3mm" target="_blank" href="http://www.hitarek.com">Free Clock</a></center></div>

    Add Stylish Flash Clock 2


    • If you want to add this Clock,then Copy  and paste the below code
    <div class="noop-clock"><center><!-- hitarek.com --><embed width="210" src="http://www.hitarek.com/clock/clock24-2.swf?TimeZone=IST&Place=&" height="140"  type="application/x-shockwave-flash"></embed></center><center><a style="font-size: 3mm" target="_blank" href="http://www.hitarek.com">Free Clock</a></center></div>

    Add Stylish Flash Clock 3


    • If you want to add this Clock,then Copy  and paste the below code
    <div class="noop-clock"><center><!-- hitarek.com --><embed width="120" src="http://www.hitarek.com/clock/clock5-1.swf?TimeZone=IST&Place=&" height="230" wmode="transparent" type="application/x-shockwave-flash"></embed></center><center><a style="font-size: 3mm" target="_blank" href="http://www.hitarek.com">Free Clock</a></center></div>

    Add Stylish Flash Clock4


    Free Clock


    • If you want to add this Clock,then Copy  and paste the below code
    <div class="noop-clock"><center><embed height="230" src="http://www.hitarek.com/clock/clock5-2.swf?TimeZone=IST&amp;Place=&amp;" type="application/x-shockwave-flash" width="120" wmode="transparent"></embed></center><center><a style="font-size: 3mm" target="_blank" href="http://www.hitarek.com">Free Clock</a></center></div>

    Add Stylish Flash Clock4


    Free Clock


    • If you want to add this Clock,then Copy  and paste the below code
    <div class="noop-clock">
    <center><iframe allowtransparency="true" frameborder="0" height="148" hspace="0" marginheight="0" marginwidth="0" scrolling="no" src="http://www.hitarek.com/animation/dolls5.html" vspace="0" width="100"></iframe></center><center><a href="http://netoopsblog.blogspot.com/" style="font-size: 2mm;" target="_blank">FreeWidgets</a></center></div><center><a style="font-size: 3mm" target="_blank" href="http://www.hitarek.com">Free Clock</a></center>


    Add Stylish Flash Clock5


    • If you want to add this Clock,then Copy  and paste the below code
    <div class="noop-clock">
    <center><!-- hitarek.com --><embed width="130" src="http://www.hitarek.com/clock/clock11-4.swf?TimeZone=IST&Place=&" height="130" wmode="transparent" type="application/x-shockwave-flash"></embed></center><center><a style="font-size: 3mm" target="_blank" href="http://www.hitarek.com">Free Clock</a></center></div>

    Add Stylish Flash Clock6


    • If you want to add this Clock,then Copy  and paste the below code
    <div class="noop-clock">
    <center><!-- hitarek.com --><embed width="160" src="http://www.hitarek.com/clock/clock25-9.swf?TimeZone=IST&Place=&" height="160" wmode="transparent" type="application/x-shockwave-flash"></embed></center><center><a style="font-size: 3mm" target="_blank" href="http://www.hitarek.com">Free Clock</a></center>

    </div>

    Add Stylish Flash Clock#


    • If you want to add this Clock,then Copy  and paste the below code
    <div class="noop-clock">
    <center><!-- hitarek.com --><embed width="140" src="http://www.hitarek.com/clock/clock22-5.swf?TimeZone=IST&Place=&" height="180"  type="application/x-shockwave-flash"></embed></center><center><a style="font-size: 3mm" target="_blank" href="http://www.hitarek.com">Free Clock</a></center>
    </div>

    Add Stylish Flash Clock 7


    • If you want to add this Clock,then Copy  and paste the below code
    <div class="noop-clock">
    <object><param name="movie" value="http://flash-clocks.com/free-flash-clocks-for-websites/free-flash-clock-24.swf"><embed src="http://flash-clocks.com/free-flash-clocks-for-websites/free-flash-clock-24.swf" width="150" height="150" wmode="transparent"> </embed></object>
    </div>

    Add Stylish Flash Clock 8


    • If you want to add this Clock,then Copy  and paste the below code
    <div class="noop-clock">
    <object><param name="movie" value="http://flash-clocks.com/free-flash-clocks-for-websites/free-flash-clock-15.swf"><embed src="http://flash-clocks.com/free-flash-clocks-for-websites/free-flash-clock-15.swf" width="150" height="150" wmode="transparent"> </embed></object>
    </div>

    Add Stylish Flash Clock 9


    • If you want to add this Clock,then Copy  and paste the below code
    <div class="noop-clock">
    <embed src=http://flash-clocks.com/free-flash-clocks-blog-topics/free-flash-clock-175.swf width=200 height=200 wmode=transparent type=application/x-shockwave-flash></embed>
    </div>

    Add Stylish Flash Clock 10


    • If you want to add this Clock,then Copy  and paste the below code
    <div class="noop-clock">
    <embed src=http://flash-clocks.com/free-flash-clocks-blog-topics/free-flash-clock-150.swf width=200 height=200 wmode=transparent type=application/x-shockwave-flash></embed>
    </div>

    Add Stylish Flash Clock@


    • If you want to add this Clock,then Copy  and paste the below code
    <div class="noop-clock">
    <object><param name="movie" value="http://flash-clocks.com/free-flash-clocks-for-websites/free-flash-clock-63.swf"><embed src="http://flash-clocks.com/free-flash-clocks-for-websites/free-flash-clock-63.swf" width="150" height="150" wmode="transparent"> </embed></object>
    </div>


    Add A Static Clock

    Step 2:
    • Copy and Paste the CSS code below after the code of clock.
    <style type="text/css">.noop-clock {
    position: fixed;
    right: 0%;
    top: 0%;
    padding: 3px 7px;
    box-shadow: -2px 2px 6px;

    }</style>
    •  Then click on Save.
    With this tutorial you have got a Beautiful Clock.
    If you feel any confusion or doubt then please do comment.

    Posted on Friday, October 17, 2014 by Unknown

    No comments

    At this point, you are all probably pretty familiar with Facebook, and some of the more common features like updating statuses, checking-in, browsing profiles, pages, and apps, and many more day to day actions.

    However, most people are not aware of a number of interesting, but mostly useless, tricks and hacks, which you can perform on Facebook today.

    Here are five of our favorite useless, but interesting, Facebook tricks and hacks for you try:


    • Removing Your Last Name in Your Facebook Profile


    Image source: https://www.facebook.com/wittykittymi
    The Trick:

    As part of Facebook’s security checks, you are required to completely fill out your account details to successfully create an account. By default, Facebook requires every user to enter their full name prior to saving their profile settings.

    With this trick, you will be able to bypass Facebook’s restrictions and drop your last name.
    How to Do it:

    1) Open Mozilla Firefox (Firefox is required for this hack to work)

    2) Go to Options -> Advanced -> Network -> Settings -> Connection Settings -> Manual Proxy Configuration

    3) In the HTTP Proxy Field, enter 103.10.62.30, port 8080, or use any Indonesian Proxy.


    4) On your facebook profile, go to Account settings — > Change Language to BAHASA INDONESIA

    5) Remove your middle name & last name.


    • Adding Animated Custom Tabs


    Image Source: https://www.facebook.com/TriviaManiaOfficial
    The Trick:

    Facebook doesn’t allow users to upload animated GIFs anywhere on the site, so if you wanted to have an animated GIF somewhere, you’re out of luck, unless…

    There is a trick that allows anyone, who has the following resources, to bypass this limitation in uploading animated GIFs for custom tabs.
    How to Do it:

    1) You must have Adobe Photoshop C5 & Quicktime Player.

    2) Select the animate GIF you want to upload.

    3) Open Adobe Photoshop CS5 and go to File > Import > Video frames to layers. In the File Name box, just enter *.* as your filename and choose your GIF image.

    4) Resize your GIF to 111 x 74 pixels to fit the custom tab image .

    5) Save your file in a PSD format. Check the save option, ‘LAYERS’

    • Creating Your Own Emoticon on Facebook Chat


    The Trick:

    While this is not actually new, many people have no idea about this feature. Since 2011, Facebook has allowed users to chat with their friends using custom emoticons, and now you can too. Just by getting a page’s or a profile’s ID or username, Facebook will let you use their profile pictures as your chat emoticon in thumbnails…

    *note this only works in the Facebook Chat and not in updates.
    How to Do it:

    1) Go to any profile, official Page, or event that you want to use as an emoticon.

    2) Look for the profile ID at the end of the URL, such as “Mcdonalds” from https://www.facebook.com/McDonalds

    3) Place that username or number in double brackets like [[Mcdonalds]]

    Note: Pages with no username /vanity URL e.ghttps://www.facebook.com/McDonalds have default ID numbers displayed on their URLs (https://www.facebook.com/pages/Socially-Awkward-Penguin/98438140742). So when you cannot find a profile or a page’s username, just refer to the numbers at the end of the URL, instead.

    4) Enter that into a Facebook Chat or Message field.

    Rage Faces IDs:

    Here is a collection of a few rage faces courtesy of Reddit.

    Using Profile IDs

    Troll face: [[171108522930776]]
    Are you f****** kidding me : [[143220739082110]]
    Not bad Obama: [[169919399735055]]
    Me G usta: [[211782832186415]]
    Mother of God: [[142670085793927]]
    Cereal Guy: [[170815706323196]]
    LOL Face: [[168456309878025]]
    NO Guy: [[167359756658519]]
    Yao Ming: [[218595638164996]]
    Derp: [[224812970902314]]
    Derpina: [[192644604154319]]
    Forever Alone: [[177903015598419]]
    F yeah: [[105387672833401]]
    Challenge accepted: [[100002727365206]]
    Okay face: [[100002752520227]]
    Poker face: [[129627277060203]]
    Okay face: [[224812970902314]]
    Socially awkward penguin: [[98438140742]]
    No: [[167359756658519]]
    MOG: [[142670085793927]]
    Like a sir: [[168040846586189]]

    Using Usernames / Vanity URL

    Not Bad: [[NotBaad]]
    Rage face: [[FUUUOFFICIAL]]


    • Making Your Profile Photo Un-clickable


    The Trick:

    Not everyone really wants to have their header image clickable, but yet that’s the way Facebook header images work, or do they? Well, if you’re curious, you should give this one a try:
    How to Do it:

    1) Go to your Albums – > Profile Pictures

    2) Select your current profile picture.

    3) Adjust privacy setting to “Only Me”


    • Selecting / Inviting All Friends


    The Trick:

    Selecting and inviting all of your friends in an event can be a tedious task, especially if you have more than 1,000 friends to send invitations to.

    Luckily, this trick that allows users to select/invite all of their friends in an event or an app – with just one click.
    How to Do it:

    1) Open Firefox and go to your Facebook page to invite all friends to like your page.

    2) Select “All Friends” instead of “Recent Interaction” so that you can invite all friends to your page. Scroll down till all of your friends are shown in the page.

    3) Press Ctrl+Shift+K and a small window will appear at bottom.

    4) Paste the below code in it and click enter.

    javascript:elms=document.getElementsByName(“checkableitems[]”);for (i=0;i < elms.length;i++){if (elms[i].type=”checkbox” )elms[i].click()};

    Hacks and Tricks like the above, should always be attempted using caution. We are not aware of anyone ever getting in trouble for using the above tricks, but in some cases they do bypass the intended functionality of Facebook, so be careful.

    Which of these tricks is your favorite? If you have any new Facebook tricks you would like to share, please let us know in the comments!

    Posted on Friday, October 17, 2014 by Unknown

    No comments